EAT RAINBOW LOVE


University of Birmingham graduate with a passion for food & cooking as part of a healthy lifestyle

Twitter: @EatRainbowLove
Instagram: lottierainbow

Monday, 9 July 2012

Mozzarella, chicken, tomato and basil pizza

I love making pizza, it tastes so much better (in a healthier sort of way!) I have posted the recipe I use before  here but wanted to do two new posts on the specific toppings I used because they both worked so well. Sorry for the bad quality of the photos, the lighting is impossible with my camera sometimes, so this is the best I could do - plus I just wanted to eat it asap so was rushing a bit... This recipe is easy to follow and is so worth it for a delicious treat!

*the ingredients list for the bases and tomato sauce are for 2 large pizzas - the toppings are just for one of these pizzas, since I'm doing another post with the other toppings I used*

Makes 2 large pizza bases:
- 400g plain white strong flour
- 1 tbsp / 15g dried yeast 
- 50ml boiling water, 100ml cold water
- 1 tsp sugar- 2 tbsp olive oil, plus extra for brushing over base
- 1/2 tsp salt
- tepid water, to add to the dough
- extra flour for dusting surface
For the tomato sauce:
- 1 large jar of passata (crushed tomatoes)
- 2 cloves garlic
- pinch of salt
- handful of fresh basil, roughly torn
- 1 tsp dried mixed Italian herbs
- 1 tbsp green pesto


For the topping:
- drizzle of olive oil
- 2 small chicken breasts, cut into chunks
- 1 tsp dried mixed Italian herbs
- 1 ball of buffalo mozzarella, sliced
- few handfuls of cherry tomatoes, halved
- fresh basil, torn
- handful of parmesan, grated


1. To make the pizza bases, sift the flour into a large bowl and make a well in the middle
2. In a jug, mix the yeast with the boiling water, cold water and sugar. Stir constantly until dissolved and leave in a warm place until it becomes foamy - around 20 minutes
3. Pour the yeast mixture into the hollow in the flour, along with the salt and the oil, and knead everything together for about 10 minutes, or until the dough is smooth and elastic. You can do this on a floured work surface
4. Return to the bowl and cover with cling film, leaving a small gap. Put in a warm place and leave to rise for about an hour and a half, or until doubled in size.
5. Once risen, knead briefly and gently, then split into two pieces and roll out on a floured surface. Place on a baking sheet on a baking tray - it is ready to put toppings on!
6. For the tomato sauce, in a bowl mix all the ingredients together and season to taste. Spread generously on the pizza bases (should cover 2 or 3 so you might have some leftover)
7. Pre-heat the oven to gas mark 6 / 200 degrees. Heat the oil in a frying pan and cook the chicken with the dried herbs. Set aside to cool.
8. Place slices of mozzarella on top of the base, followed by the chicken, tomatoes and basil. Sprinkle generously with parmesan and bake in the oven for around 15 minutes.
Enjoy :)

Sunday, 8 July 2012

Pan-fried duck breast and noodles with plum sauce

This isn't quite as fancy as the title makes out - you know in Tesco they do the 3 for £3 on noodles, stir fry veg pack and a sauce - well, that is really all this is - plus the duck! So it is egg noodles, the plum & hoisin sauce which is delicious and a vegetable mixture of spring greens, bean sprouts, carrot, broccoli, onion and pepper (we added mushrooms too). The duck breasts were from a pack from Costco, and I have never cooked duck until last night so I was a little concerned... The meat was tender though and the fat crisp, so it turned out well and of course went perfectly with the stir fry. This is a perfect stir fry if you want something a little more special than just chunks of chicken or pork.

Serves 2
- drizzle of olive oil
- 1 tsp chopped ginger
- 2 duck breasts (with the fat)
- 1 pack of egg noodles
- range of stir-fry vegetables (see above for details)
- plum and hoisin sauce

1. In a large shallow pan, heat the oil and fry the ginger for a few minutes.
2. Score the fat on the duck breasts, then place fat-side down in the pan. Cook for around 10 minutes, or until the fat is crispy.
3. Heat some olive oil in a wok and stir-fry the vegetables for a few minutes. Add the noodles and cook for another few minutes, then add the sauce and continue to cook on a low heat.
4. Turn the duck breasts over and cook for around 5 minutes. Cut open to check the colour inside - depending on how you like it, cook for longer or serve. I found that it wasn't cooking so well in the pan so we put it in the oven for around 5-10 minutes on 200 degrees, then returned to the pan fat-side down to crisp up again.
5. Once everything is cooked to your preference, Serve the stir fry and place the duck breast cut into diagonal strips on top.

Enjoy :)

Soy, honey and garlic salmon

This marinade was a bit of an experiment, and it worked out really well. The sweetness of the honey with the salty soy sauce went perfectly well along with the garlic which I didn't expect! The salmon was incredibly moist and tender - I wished I had someone to share this with! I was just cooking for myself, since my mum doesn't eat fish. So please try this and let me know what you think. I wasn't very hungry at the time so I just served it with broccoli that I stir fried with sesame seeds, but this would be lovely with wholegrain rice.

(Sorry for the lack of posts - can't believe I only did 7 in June! I have been on holiday recently as well so quite a lot of these recipes are from a few weeks ago that I just haven't had the time to post. Hope you enjoy and sorry again for being so silent recently)

Serves 1
- 1 salmon fillet 
- 1 tbsp olive oil
- 1 tbsp honey
- 1 tbsp soy sauce
- 1 clove of garlic, crushed

1. In a small dish, mix all the above ingredients half an hour before cooking to allow time to marinate.
2. Pre-heat the oven to 180 degrees / gas mark 4. Wrap the salmon in foil and place on a baking tray in the oven for around 20 minutes, or until the salmon is cooked through and flaky

Enjoy :)
Thursday, 21 June 2012

Cheesy broccoli pasta bake

I made this the other night - it's nothing too special, I just really fancied some comfort food and a pasta bake is the ultimate comfort food for me. I made a simple cheese sauce and although I'm not a huge broccoli fan, I do love it in pasta bakes (what doesn't taste good when it's coated in cheese sauce anyway?) We also had some bacon in the fridge, and of course I always like to use onions and garlic with pasta so voila, this dish was born! And it is scrummy...

Serves 2-3
- 200g whole wheat penne
- olive oil
- 2 cloves garlic
- 1 small onion
- 3-4 rashers bacon, cut into chunks
- 150g broccoli florets
- 20g butter
- 20g plain flour
- 200ml milk
- 1 tsp wholegrain mustard
- 75g cheddar cheese, grated, plus extra for sprinkling
- pepper, to season

1. Pre-heat the oven to gas mark 5 / 200 degrees. Cook the pasta according to packet instructions, and add the broccoli florets around 5 minutes to the end of the pasta cooking time. Drain and set aside.
2. Meanwhile, soften the onion and garlic in the olive oil, then add the bacon until beginning to brown and crisp. Remove from the pan and set aside.
3. Using the same pan, to make the cheese sauce melt the butter and stir in the flour over a low heat until it forms a paste. Gradually add in the milk, stirring constantly until the sauce begins to thicken. (Be patient, it may take a while!) Once the sauce is coming together, add the mustard and the cheese; at this stage the sauce should be thick and smooth from the cheese. You can always add a little more milk if it is too thick 0 keep stirring!
4. Return the pasta and broccoli to the pan, add the bacon and onion and stir through the cheese sauce. Pour into an oven proof dish. Sprinkle with the remaining cheddar. I added some brie too because we had a bit leftover. Parmesan would work too and add breadcrumbs if you want a crunchy texture.
5.  Season with pepper and bake in the oven for 20-30 minutes, or until bubbling and golden brown and crisp on top.

Enjoy :)

Sunday, 17 June 2012

Cheese, tomato and herb quiche

I absolutely love quiche but have never attempted to make one before because whenever I look at recipes they always seem to use so many eggs and so much cream! I also love making (and eating..) shortcrust pastry but was always afraid that turning it into a quiche would leave it with a soggy bottom. Well, today I proved my assumptions to be very wrong! I looked over a few recipes and decided to use all milk instead of cream, with a bit of light soft cheese, and only one egg. I used fresh tomatoes, lots of herbs and some cheddar and parmesan, and the flavours were amazing. The texture was absolutely perfect as well - no soggy bottom, but crisp pastry instead, hoorah! I made this for Father's day as we decided to have a buffet. This quiche is perfect party food for buffets, makes a great lunch, or even dinner - serve with a side salad and some new potatoes in parsley butter for a delicious, summer meal (suitable for vegetarians!) I can't wait to create more quiche recipes, maybe bacon and leek, and next time I make this tomato one, I want to try putting broccoli in it too (I've had one like this from Sainsbury's and it is scrummy). If you are to try out one recipe this summer, I think it should be this one! Pastry isn't as tricky as you might think to get right, just follow the steps below.
Makes 1 large quiche (4-8 people)
For the pastry:
- 175g plain flour
- pinch of salt
- 40g lard
- 40g margarine
- 1 tsp thyme, chopped (I used dried)
- 2-3 tbsp water

For the filling:
- small knob of butter
- 1 small onion, chopped
- 350g tomatoes, sliced
- pinch of salt and pepper
- handful of parsley, chopped (I used fresh)
- 1 tsp thyme (dried)
- 1 tsp basil (dried)
- 2 tbsp boiling water
- 250ml milk
- 1 egg
- 1 tbsp light soft cheese
- handful of parmesan, grated
- handful of cheddar, grated

1. Pre-heat the oven to gas mark 4 / 180 degrees. For the filling, gently fry the onion in the butter for a few minutes until softened. Add the tomatoes, herbs and salt and pepper and stir.
2. Add the boiling water and simmer for 5-10 minutes, or until the tomatoes are softened. Leave to cool.
3. Whilst this is cooling, start on the pastry. Sieve the flour and salt into a large mixing bowl and add the margarine and lard.
4. Rub the fat into the flour with your fingertips 'from a height' (oo jamie oliver style...) until it resembles breadcrumbs. You can add in the thyme at this stage or the previous stage.
5. Add the water and knead gently into a soft dough. On a floured work-surface, roll out the dough until large enough to fit into a flan dish or metal case. Push down into the case, pressing into the sides.
6. To finish the filling, whisk together the milk, egg, soft cheese, parmesan and chessar until combined. Stir into the tomato and onion mixture and gently pour into the pastry case until filled to the top. Grate some more cheddar on top. I found that I had too much filling for the case, maybe because my case was too small. I put the remaining filling into little ramekin dishes and baked in the oven with the quiche so that it could be eaten anyway and not wasted.
7. Bake in the oven for 30-45 minutes, or until the filling has set and is golden brown. 
Enjoy :)

Saturday, 16 June 2012

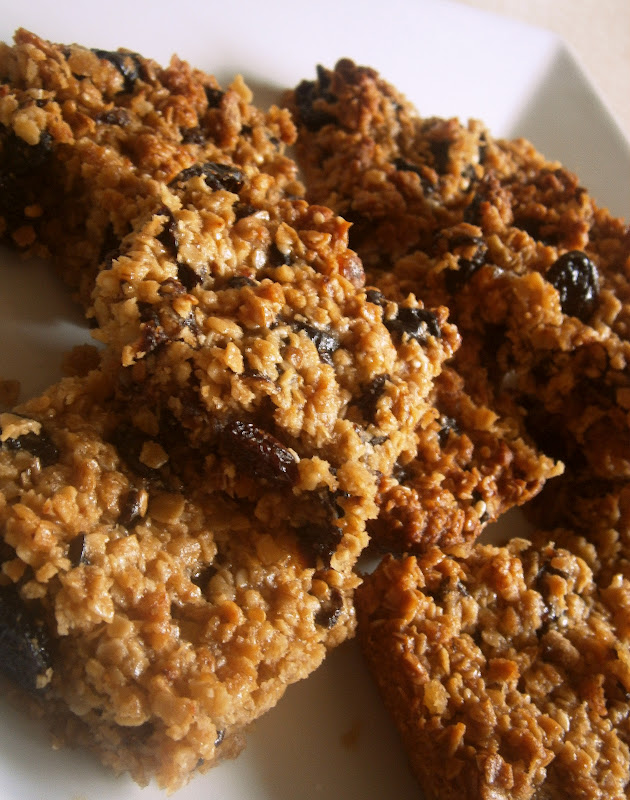
Fruity flapjacks

I have never made flapjacks before today, in fact, I was never really that keen on them before either, but these have completely blown me away! I looked up a few different recipes and decided on the ingredients that I thought would work best (and with what I had in the house!) These are prune flapjacks, but the prunes can easily be swapped for apricots, dates, cranberries etc. They are incredibly moist, yet still crispy and crunchy when you get an edge piece. I used mainly margarine so I was shocked that they tasted so satisfyingly bad for you and buttery - obviously they're still not particularly 'healthy' but the marg does help a bit... I nearly always say this about the recipes I post, but these really were so easy to make as well! A brilliant treat to make if you're having friends or family over, everyone's bound to love them. I would probably modify the recipe if I was making chocolate flapjacks because the textures would be different, but you could always try just swapping the dried fruit for chocolate chips although I don't know if the texture would be as perfect! I will definitely stick to this recipe in the future and make these again and again - hope you like them as much as me.
Makes about 9 flapjacks
- 125g margarine, plus extra for greasing
- 50g butter
- 75g soft, brown sugar
- 55g runny honey
- 100g dried prunes (pitted), chopped
- 40g mixed dried fruit (raisins, saltanas etc.)
- 1 tsp sesame seeds
- 1 tsp golden linseeds (flax)
- 225g oats

1. Pre-heat the oven to gas mark 4 / 180 degrees and grease a square or rectangular tin (e.g. 10.5 x 6.5 inches)
2. Over a low heat, melt the margarine, butter, sugar (leaving a little bit left) and honey in a pan, stirring until fully melted and the sugar dissolved.
3. Stir in the prunes, dried fruit, seeds and oats until fully mixed and coated.
4. Spoon the mixture into the tin, flattening with the back of a wooden spoon. Sprinkle over the remaining sugar and bake in the oven for 20-25 minutes, or until golden brown.
5. Remove from the oven and cut into squares/rectangles, and leave to cool in the tin.

Enjoy :)

Monday, 11 June 2012

Chicken chasseur with new potatoes in parsley butter

So this doesn't look particularly appetising... it looked better in real life! I've had one of those schwartz (but the Tesco version) chicken chasseur packet mixes lying around for ages and instead of using it I thought, I'm gonna make it from scratch! It went really well - I looked at a few different recipes beforehand and decided on the ingredients I wanted to use (or had in the house) and the result was scrummy. I'm not a huge fan of new potatoes (does anyone else think they taste weird?) so lathering them in butter and parsley was a genius idea. There is parsley in the chasseur as well so this worked nicely, as would parsley mash - I've made this before and it's delicious. You can tell I have a lot of parsley to use up... my mum bought a lot because it's a key ingredient in my favourite meal which she cooked me the other day (may share this recipe with you soon!) so I've been trying to use it up. Another great way to use parsley is making a lemon and parsley sauce (parsley, lemon juice, butter) which is yummy with chicken (just flatten and fry some chicken breasts). Chicken chasseur traditionally has wine in it but we didn't have any in the house and it tasted fine without, just not as rich I suppose. I have never really cooked this meal before and it made a really nice change - I would never really put chicken and chopped tomatoes together but, hey, it works! I used chicken thighs because they're much more moist and tender than chicken breast when cooked this way.

Serves 2
For chicken chasseur
- drizzle of olive oil
- 2 cloves garlic, crushed
- 1/2 red onion, chopped
- 4 rashers bacon, cut into large pieces
- 2-3 chicken thighs, skinless and boneless, cut into chunks
- 150g button mushrooms, or larger mushrooms, quartered
- 1 tbsp plain flour
- 400g tin chopped tomatoes
- 1/2 beef stock cube
- dash of Worcestershire sauce 
- large handful of fresh parsley, chopped

For potatoes
- 450-500g jersey royal potatoes
- large knob of butter
- handful of fresh parsley, chopped
- salt & pepper


1. Heat the olive oil in a deep pan and fry the garlic and onion for a few minutes until softened. Add the bacon and cook for a further few minutes, until the bacon begins to brown. Add the chicken pieces for around 5 minutes, or until they are cooked through and browned.
2. Add the mushrooms and stir to coat in the oil/bacon and chicken fat. Continue to cook until reduced in size and softened. Add the plain flour and stir until coated and a sort of paste has been formed. Pour in the chopped tomatoes and crumble in the beef stock cube. Boil for about 10 minutes, or until thickened.
3. Pour in a dash of Worcestershire sauce and add the parsley. Season to taste and serve with the new potatoes (see below).

1. Boil the potatoes in salted water for 20-25 minutes.
2. Meanwhile, in a small pan, melt the butter and stir in the parsley.
3. Once the potatoes are softened, drain, and stir in the parsley butter and serve with the chasseur and green vegetables (I cooked green beans).

Enjoy :)

Monday, 4 June 2012

Jubilee cake and cupcakes!

Most of the cupcakes are filled with raspberry jam so resemble mini victoria sponges (perfectly British for the Queen's Jubilee!), and both the cupcakes and the cake are topped with delicious vanilla buttercream. I am aware that the fruit flag pattern on the cake isn't exactly what the flag looks like, but I didn't have enough blueberries to do triangles or any raspberries for the diagonal lines so I just did what I could... I made these with my friend Leah, and it was so much quicker and more fun baking with someone else! We didn't have any red, white and blue sprinkles, but the union jack cupcake cases make up for it, and multi-coloured sprinkles still look cute. This is a really easy recipe to follow, so give it a try and make someone smile this bank holiday weekend :)

Makes 8 cupcakes and one small sponge
- 125g soft margarine
- 125g caster sugar
- 2 medium eggs, whisked
- 1/2 tsp vanilla essence
- 125g self-raising flour, sieved
- 1/2 tsp baking powder

For the buttercream:
- 150g unsalted butter
- 225g icing sugar
- 2 tbsp hot milk
- 1 tsp vanilla extract

Toppings and decorations
- few spoonfuls of raspberry jam
- sprinkles
- strawberries and blueberries

1. Pre-heat the oven to 180 degrees, line a muffin tin with 8 cupcake cases, and grease a small rectangular oven-proof dish or tin for the sponge.
2. In a large mixing bowl, cream together the margarine and sugar until light and fluffy. Gradually whisk in the eggs, vanilla essence, flour and baking powder until there is a smooth batter. Spoon into the cupcake cases (about 2/3's full) and pour the remains into the greased dish.
3. Bake in the oven for around 12 minutes for the cupcakes, and slightly longer for the sponge. Leave to cool on a wired rack.
4. Meanwhile, make the buttercream by whisking together the butter, sugar, milk and vanilla essence until smooth. Set aside.
5. To fill the cupcakes with jam, I used a cupcake plunger which removes the core of the cake. However, you can use a knife to do this it just takes a little longer.

6. Fill the centre with raspberry jam. If you want, you can put the sponge tops back on or leave it as it is.
7. Spread both the cake and cupcakes with the buttercream, use sprinkles and/or fruit to decorate and voila.
Enjoy :)