EAT RAINBOW LOVE


University of Birmingham graduate with a passion for food & cooking as part of a healthy lifestyle

Twitter: @EatRainbowLove
Instagram: lottierainbow

Tuesday, 28 May 2013

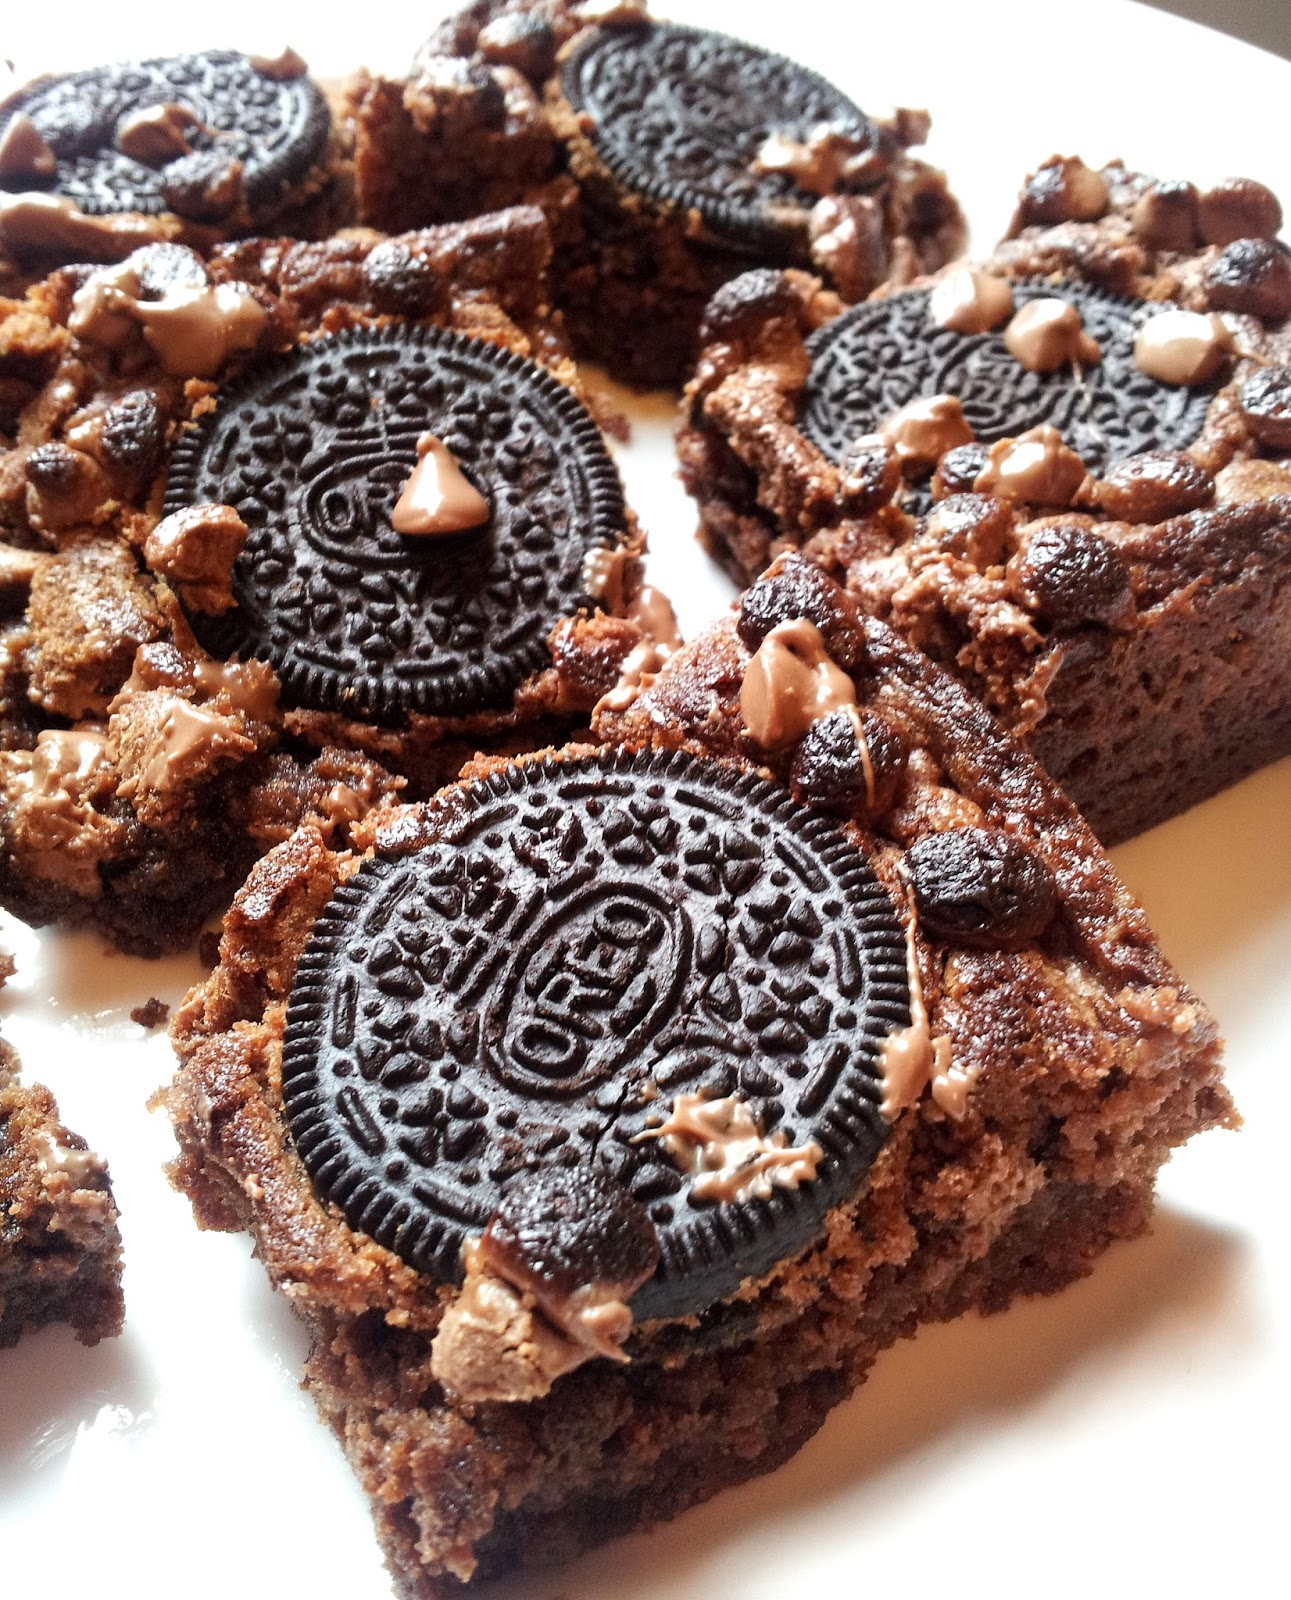
Oreo brownies

I just made these and tried them hot from the oven and they are divine! It was a bit of an experiment since I couldn't find a recipe for oreo brownies that I liked, so I came up with something and was very nervous but it worked out really well. They are moist and gooey in the middle, and a little crisp and chewy around the edges - the perfect combination. And with the added crunch from the whole oreos and cookie pieces (yes, there are crushed Maryland cookies in here too!), and the soft chocolate chips they have amazing texture. Everyone should go and make these right now, you won't be disappointed.
Makes 12
- 250g salted butter
- 225g caster sugar
- 2 eggs, beaten
- 50g dark chocolate, melted
- 2 tbsp cocoa powder
- 150g plain flour
- 1 tsp baking powder
- dash of milk
- 100g milk chocolate chips
- few Maryland double chocolate chip cookies
- 12 oreos

1. Pre-heat the oven to 180 degrees and grease and line a baking dish.
2. Cream together the butter and sugar in a large mixing bowl until light and fluffy.
3. Whisk in the beaten eggs then stir in the melted chocolate.
4. Fold in the cocoa powder, flour and baking powder until mixed well.
5. Stir in a dash of milk to make the mix creamier, then add half of the chocolate chips (50g) and a few (about 4) crushed Maryland cookies and mix until well combined.
6. Pour this brownie mixture into the prepared tin and spread evenly. Press 12 oreos into the mixture.
7. Bake in the pre-heated oven for around 25 minutes. Remove from the oven and sprinkle with the remaining chocolate chips, and bake again for a further minute or two.
8. Leave to cool for a few minutes then cute into 12 brownies and serve hot or leave to cool further.

Enjoy :)

Turkey meatballs

I decided to make turkey meatballs for a change since they are healthier (lower in fat) than beef meatballs, and seem to be lighter and generally more fitting for the summer months. They were really tasty and easy to make and cook - usually home-made meatballs seem to crumble when you fry them but these didn't so I was very pleased. I served them with spaghetti and a Dolmio tomato sauce, topped with fresh parmesan. 

Serves 2
- 250g turkey mince
- 1 onion, chopped
- fresh parsley, chopped
- salt & pepper
- 1/2 beaten egg
- olive oil, for frying

1. Place the raw mince in a mixing bowl
2. Fry the onion to soften then set aside to cool. When cooled, add to the mince, along with a generous handful of chopped parsley and seasoning.
3. Gently mix together with a wooden spoon, then add in the egg and beat together until sticky. (I made the mistake of adding too much egg which made the mix too runny - if this happens just add some flour!)
4. When the right consistency, use your hands to shape into balls -  did mine a little big but aim to make 6 (3 each).
5. Heat the oil in a frying pan and add the meatballs.
6. Fry over a medium heat and keep turning so that all sides turn golden brown.
7. This should take about 15 minutes in total - cut one open to check it is cooked in the middle.
8. Serve with pasta and tomato sauce, and voila!

Enjoy :)

Sunday, 26 May 2013

Recipe repeats!

I have been appalling with blogging the last couple of months - end of second year at university means a lot of assignments and exams, but I still struggle to find the time even though these are all over now! I have also been cooking/baking a lot of the same things that are already on here and it would be a bit pointless to post them again. I have a couple of new recipes to put up in the near future, but this summer I am hoping to get back into experimenting with new recipes for dinners and get back into doing a lot of baking, so watch this space for some delicious recipes. I want to try out different tapas dishes too so keep checking back over summer. I am going to Morocco in a week so may be inspired by some dishes there too!

I thought I would post just add some recipe repeats in here because they are particularly good:

1. Chocolate smartie squareshttp://eatrainbowlove.blogspot.co.uk/2012/03/chocolate-smartie-squares.html
These are so easy to make, absolutely delicious and look really cute.

2. Homemade pizza - dough and all! http://eatrainbowlove.blogspot.co.uk/2012/03/perfect-pizza.html
These are our two favourite toppings - parma ham and mushroom with parsley and parmesam, and goats cheese and red onion - delicious!

This is the recipe I always use for the sponge and buttercream, only this time, these cupcakes that I made at Easter had lemon juice in both the sponge and the icing for a sweet tang. I also made chocolate ones as well.

Hope these give you some inspiration :)

Monday, 18 March 2013

Beef Bourguignon

I'm surprised to say that I don't think I've ever even tried beef bourguignon before, so when I wanted to cook this for mother's day I decided to stick with Lisa Faulkner's recipe, since her recipes always turn out well and are delicious - this was no exception. I even served it with mustard mash, as she suggested, and it all worked beautifully together, everyone loved it. I would highly recommend this recipe, even though I don't have any others to compare it to (I've heard Lorraine Pascale's is also good), because the beef was so tender and the flavours were amazing from the shallots, wine and bacon mm mm. Perfect for a special occasion.

Serves 4-6
- 500g stewing/braising steak
- flour, for dusting
- olive oil, for frying
- 200g bacon lardons
- 300g shallots, peeled and halved
- 3 garlic cloves, crushed
- 2 tbsp tomato purée
- 125g button mushrooms
- 500ml red wine
- 250ml beef stock
- 1 bouquet garni (dried parsley, thyme, rosemary and bay leaf)
- salt and pepper

- mustard mash - potatoes, milk, butter, wholegrain mustard

1. Preheat the oven to 160 degrees.
2. Coat the beef in seasoned flour.
3. Heat a generous amount of oil in a large casserole dish and brown the meat. Using a slotted spoon, remove the meat and set aside.
4. In the same dish, add the lardons, shallots and garlic and fry until browned.
5. Add the tomato puree and mushrooms. Return the beef to the dish and add the wine, stock and herbs.
6. Bring to the boil then cover with a lid and cook in the oven for around 3 hours. Serve with mustard mash!

Enjoy :)

Monday, 4 March 2013

Moroccan chicken

This is a dish my dad used to make years ago - I only just remembered it and how delicious it was so  had to get the recipe from him straight away. I'm not a fan of spicy food or coriander therefore most Indian or Moroccan recipes I have to adapt or I just tend not to try them which is a shame. The reason I love this one so much is because it isn't spicy at all but still has incredible flavour from the chicken thighs, cinnamon and sweet apricots. The sweet with savoury in this dish works perfectly together and the light, fluffy cous cous is perfect with the sauce. As I've sad before, I love cooking with chicken thighs because they're so moist and tender. The other good thing about this recipe is that it's really quick to make but it still tastes like a special meal that someone's slaved over for hours...
Serves 2
- 4 boneless and skinless chicken thighs, cut in half
- 2 cloves of garlic, crushed
- 1 onion, chopped
- 75g dried apricots, quartered
- 1 tsp ground cinnamon
- 300ml chicken stock
- 1 tsp turmeric
- lemon juice
- cous cous, to serve

1. Fry the chicken thighs in olive oil for 5-10 minutes, or until browned on both sides.
2. Add the garlic and onion and cook for a further 5 minutes.
3. Add in the apricots and cinnamon and stir.
4. Mix the turmeric into the prepared chicken stock and pour into the pan.
5. Bring to the boil, then cook for about 10-15 minutes.
6. Remove the chicken thighs and set aside, keeping hot.
7. Raise the heat and reduce the sauce until it is fairly thick and syrupy.
8. Meanwhile, cook the cous cous according to packet instructions.
9. Add the lemon juice to the sauce, then serve up the cous cous, with the chicken thighs placed on top, and pour over the sauce. Serve immediately.

Enjoy :)

Wednesday, 27 February 2013

Ham, cheese and chive bread

This is a Lorraine Pascale recipe (from her 'Home Cooking Made Easy' book) and it turned out amazing. It's a really quick loaf to make - it doesn't have yeast in it so doesn't need time to rise etc. so my expectations weren't too high - I thought it would be a bit dense and dry. But thankfully it was delicious, especially hot out the oven with butter mm mm. I made it to dip into baked Camembert (see previous post for recipe) and it was probably the best lunch I've ever had! I don't know what this bread would be like the next day - probably dry but I'm sure it would be fine toasted. I would recommend making it when you know the whole loaf will be eaten for lunch or brunch straight from the oven though, since that's when home-made bread is always best. It has a lovely crispy outside but is still soft in the middle. Don't be afraid to try baking bread because this really is super easy!

Makes 1 loaf
- 425g self raising flour
- 1 tsp baking powder
- 1/2 tsp salt
- 150g mature cheddar cheese, plus extra to sprinkle on top
- generous handful of fresh chives, finely chopped
- black pepper
- 1/2 tsp paprika
- 6 slices of ham, chopped
- 200 - 225ml water

1. Pre-heat the oven to 200 degrees.
2. Put all of the ingredients in a large mixing bowl except for the water and extra cheese. Mix well until combined.
3. Gradually stir in the water - add about 200ml water first. The dough needs to be soft but not sticky. Once the mixture is coming together, use your hands to gently knead it, adding more water if necessary.
4. Shape the dough into a ball and then flatten slightly. Slash the loaf three times vertically then sprinkle over the remaining cheese.
5. Place on a baking tray and bake in the oven for 35-45 minutes or until golden.
6. Serve warm with lots of butter or dip in baked Camembert!

Enjoy :)

Baked Camembert

I am a huge cheese lover so for me there is no better lunch than an oozy baked Camembert with caramelised onion chutney and crusty bread. This is really simple and easy but is packed full of flavour and is perfect for a special treat. I made the ham, cheese and chive bread to go with the Camembert - recipe in my next post!

Serves 2-4 people
- 1 whole Camembert
- 2 garlic cloves
- few sprigs of fresh thyme
- dash of olive oil
- caramelised onion chutney (Sainsbury's taste the difference one is perfect!)
- fresh bread or breadsticks

1. Pre-heat the oven to 200 degrees.
2. Remove all of the plastic packaging from the Camembert and place back in its wooden box.
3. With a sharp knife cut about 6 slits into the cheese. Crush or chop the garlic and push into the slits.
4. Pull the thyme leaves off the sprig and roughly tear. Push these into the slits as well and sprinkle some on top.
5. Drizzle the Camembert with olive oil then place in the oven to cook for around 15 minutes, or until the cheese is melted all the way through. 
6. Remove from the oven and open the harder top of the cheese and top generously with caramelised onion chutney. Dip in warm, crusty bread!

Enjoy :)

Thursday, 14 February 2013

Chicken casserole

Once again, sorry for the un-appetising photos but there's no pleasant way to photograph any sauce that has leeks and mushrooms in ha... This was something I threw together at the last minute and it turned out really well in the end. I called it a casserole but it doesn't even go in the oven so it's really simple and quick to make but tastes delicious. It's made with chicken thighs which I love as they're so tender. Best served with rice!

Serves 2
- olive oil
- 3 skinless and boneless chicken thighs, cut in half
- plain flour
- 1 leek, sliced
- 3 rashers of bacon, chopped
- 100g mushrooms, quartered
- 100ml white wine
- 250ml chicken stock
- 1 tsp dried parsley or mixed herbs

1. Heat some olive oil in a pan and coat the chicken thighs in some flour - cook the chicken thighs in the oil until golden brown. Set aside.
2. Next, fry the bacon, leek and mushrooms in the pan until softened. Pour in the wine and chicken stock and simmer for about 10 minutes. (Meanwhile, cook the rice in a separate pan)
3. Return the chicken to the pan and add the herbs and seasoning. Cook for a further 5 minutes then serve with the rice.

Enjoy :)

Lemon and parsley trout

There is really no attractive way to present cooked parsley... but don't let the picture put you off. I've posted this simple fish marinade before but with salmon, but I have recently discovered that I much prefer trout. It seems a lot more moist and I just generally prefer the flavour - it was also a bonus that the pack of two fillets was half price! This delicious, tangy marinade is great with fish so give it a try with three simple ingredients. Perfect served with vegetables and new potatoes, rice or even pasta.

Serves 2
- Two trout fillets
- knob of butter (about 25g)
- 1 lemon
- fresh parsley, chopped

1. Melt the butter in a dish, squeeze in as much of the lemon as you wish and stir in the parsley.
2. Rub the trout fillets in the marinade and leave in the fridge for 10-20 minutes.
3. Pre-heat the oven to 180 degrees and wrap the trout fillets in foil and place on a baking tray.
4. Bake in the oven for around 20 minutes, or until tender and flaky.

Enjoy :)

Tuesday, 5 February 2013

Honeycomb cheesecake

If you love cheesecake now, you will love it even more after trying this. It is so delicious! I've wanted to make this for a while since I love the honeycomb cheesecake from Prezzo - and I will definitely be making this time and time again, particularly because it's so quick and easy as well. The biscuit base was a little crumbly, but it didn't detract from the amazing flavour or the creamy, soft texture. I just used Cadbury crunchie bars as the honeycomb but you can use any kind, or make your own. This dessert will definitely impress!

Serves 6-8
- 200g milk chocolate digestive biscuits, finely crushed
- 50g butter
- 150ml double cream
- 50g icing sugar
- drop of vanilla essence
- 200g good quality cream cheese
- 2 Cadbury crunchie bars (or any honeycomb), roughly chopped

1. Grease a circular loose-bottomed tin, or line a normal circular tin with grease proof paper.
2. Melt the butter and mix with the crushed biscuit. Press into the tin until compact and set aside.
3. Whisk the double cream with the icing sugar until thick consistency, and add the vanilla essence. 
4. Beat the cream cheese in a separate bowl then stir into the cream and sugar mixture until combined.
5. Stir in half of the chopped honeycomb/crunchie bar then spread evenly on top of the biscuit base.
6. Sprinkle the remaining honeycomb on top of the cheesecake, then chill in the fridge for an hour or two.

Enjoy :)